Overlays with Custom Widgets in GTK
Overlays with Custom Widgets in GTK
In this post I show how to build a collapsible controls overlay in GTK, rendered over a simple custom widget.
Recently I’ve been building a GTK application that includes a custom drawing widget for editing a simple 2D map. When elements are selected in the map I wanted a nice way to edit those elements within the map itself.
I can think of a few options, ranging from most intrusive down to least.
- Make the user click a toolbar button or select a menu item to display a modal in which selected item can be edited.
- Have a pane on the side that contains the UI for editing the selected item.
- Use an overlay to render the UI within the editor view itself, and use expanders to allow the user to collapse down the UI when they don’t need it.
The first option is pretty clunky: selecting something in the map editor and then either selecting an item from a dropdown menu, clicking on a toolbar button or pressing a hot-key, and then interacting with a modal dialog containing the editing UI. This forces the user to take too many steps to get to a common action, and is probably bad UX design.
The second option, where the editing UI is contained in a pane off to one side or another, feels less clunky than the first, but can result in a lot of wasted space if the item editing UI is fairly small. If the editing UI was quite large and likely to exceed the height of the window, then it makes more sense for it to live in a pane.
The third option is my favourite, and is reminiscent of applications like Blender.

It’s interesting to me that we don’t often see this kind of UI in many GTK applications, which I worry might lead people to believe that GTK is pretty underwhelming as a UI library.
In this article I thought it would be fun to walk through creating a simple GTK application that uses an overlay widget to render a set of controls over the top of a custom drawn widget.
As we’re only focusing on the GTK side of things, I decided to use Python instead of C++.
The first thing we need to do is import the gi package and load the GTK library. We’ll then import
the Gtk and Gdk namespaces.
import gi
gi.require_version("Gtk", "3.0")
from gi.repository import Gtk, Gdk
The first thing we will establish is our main window. We’ll use a simple GtkWindow and give it a
default size of 800x800 pixels. Let’s define a new class called MainWindow that inherits from
Gtk.Window.
class MainWindow(Gtk.Window):
    def __init__(self):
        super().__init__()

        self.set_title("Collapsible Controls Overlay Demo")

        # Set the default window size to 800x800
        self.set_default_size(800, 800)
We also want to make sure that when the user closes our window the application terminates. We
typically terminate a GTK application by calling
Gtk.main_quit(), which
terminates the application event loop.
class MainWindow(Gtk.Window):
    def __init__(self):
        super().__init__()

        self.set_title("Collapsible Controls Overlay Demo")

        # Set the default window size to 800x800
        self.set_default_size(800, 800)
        # When our window is destroyed, exit the main event loop
        self.connect("destroy", Gtk.main_quit)
With our MainWindow class defined we can instantiate it, make it visible and then enter the
application event loop using
Gtk.main().
window = MainWindow()
window.show_all()
Gtk.main()
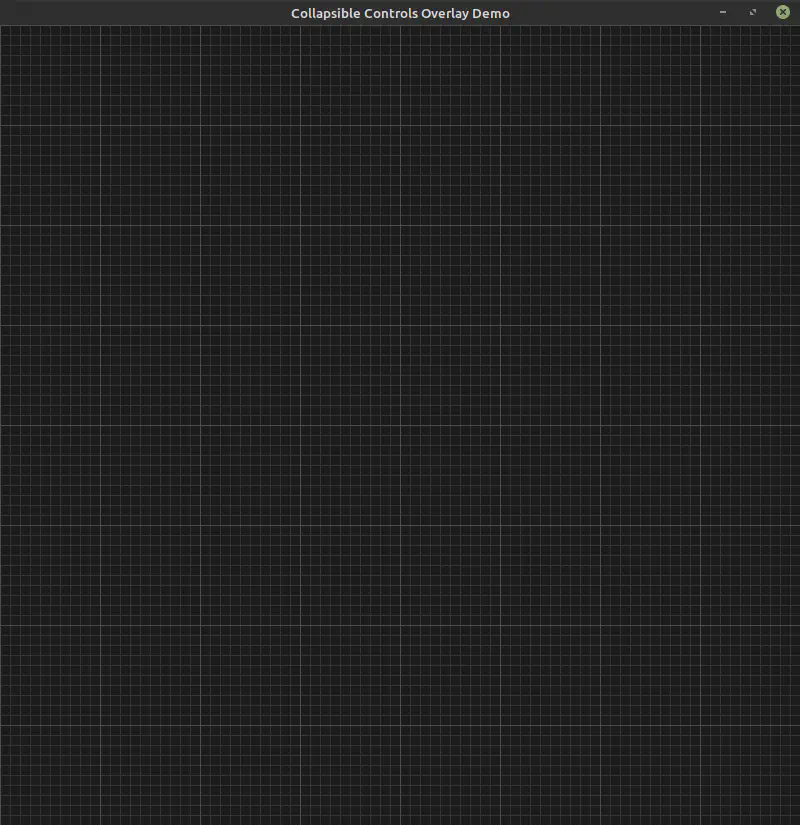
We can now run our Python script and we should get a nice square window with nothing in it.
Now that we have our main window in place we can move on to our custom drawn control. We’re going to
use a Gtk.DrawingArea that
contains a simple grid. Later we’ll add some interaction to allow us to pan the grid around by
holding down the right mouse button.
To start with we will need to define our MapEditor class. This class inherits from
Gtk.DrawingArea. In order to
draw anything, we need to connect to the
draw
event. Our event handler will be passed the current widget along with the Cairo rendering context.
We can then use this to render our widget. For now we’ll just draw the background as a rectangle
covering the visible area of the widget.
class MapEditor(Gtk.DrawingArea):
    def __init__(self):
        super().__init__()

        # Connect to the 'draw' event
        self.connect("draw", self.on_draw)

    def on_draw(self, widget, context):
        # Get the width and height of the widget
        width = self.get_allocated_width()
        height = self.get_allocated_height()

        # Render a rectangle for the background of the editor
        context.set_source_rgb(0.11, 0.11, 0.11)
        context.rectangle(0, 0, width, height)
        context.fill()
To test our widget we’ll add it as the direct child of our window. This will cause the MapEditor
widget to take up the entire interior space of the window. In the constructor for our MainWindow
we will create the instance of our MapEditor widget and then call
add on the
MainWindow to add our editor widget.
class MainWindow(Gtk.Window):
    def __init__(self):

    	# ...

        # Create the map editor instance
        self._editor = MapEditor()
        self.add(self._editor)
With these changes in place, when we run our Python script we will get a window with the dark-grey
background we rendered in our MapEditor.on_draw method.
No doubt your are now as overwhelmed by excitement as I am that we changed the background color of the window.
To make things a little more interesting than just a dark background we’ll add a grid to our map editor. We’ll also allow the user to pan the map by dragging with the right mouse button.
To get this interactivity, we will first need to tell GTK what events we are interested in
receiving. We do this by calling the
set_events
method in our MapEditor constructor. This method takes an integer, where each bit of the integer
represents the various events that we wish to receive. The values of these bits are available in the
Gdk.EventMask enumeration in
Python.
We’re interested in three events:
- When a mouse button is pressed
(
BUTTON_PRESS_MASK), - When a mouse button is released
(
BUTTON_RELEASE_MASK), and - When the mouse pointer moves around on our widget
(
POINTER_MOTION_MASK).
We use a bitwise OR to combine these three masks and pass them to the
set_events
method.
self.set_events(Gdk.EventMask.BUTTON_PRESS_MASK |
                Gdk.EventMask.BUTTON_RELEASE_MASK |
                Gdk.EventMask.POINTER_MOTION_MASK)
With the event mask set we will start to receive events for mouse button presses, releases and pointer motion within our widget. The event masks and signal names correspond as follows:
| Event Mask | Signal Name |
|---|---|
BUTTON_PRESS_MASK | button-press-event |
BUTTON_RELEASE_MASK | button-release-event |
POINTER_MOTION_MASK | motion-notify-event |
We can connect event handlers to these three signals by calling the
connect
method. As with our draw signal handler, these signal handlers will receive the widget as their
first argument. The second argument is a Gdk.Event corresponding to either the button press events
(a
Gdk.EventButton)
or pointer motion event (with
Gdk.EventMotion).
self.connect("button-press-event",
             self.on_button_press_event)
self.connect("button-release-event",
             self.on_button_release_event)
self.connect("motion-notify-event",
             self.on_motion_notify_event)
For now, each of the signal handlers will simply log the x and y fields from the event:
def on_button_press_event(self, widget, event):
    print("press event", x, y)
Putting these signal handlers together we get the following revision to our MapEditor class.
class MapEditor(Gtk.DrawingArea):
    def __init__(self):
        super().__init__()
        self.set_events(Gdk.EventMask.BUTTON_PRESS_MASK |
                        Gdk.EventMask.BUTTON_RELEASE_MASK |
                        Gdk.EventMask.POINTER_MOTION_MASK)

        # Connect to the draw and mouse events
        self.connect("draw", self.on_draw)
        self.connect("button-press-event",
                     self.on_button_press_event)
        self.connect("button-release-event",
                     self.on_button_release_event)
        self.connect("motion-notify-event",
                     self.on_motion_notify_event)

    def on_button_press_event(self, widget, event):
        print("press event", event.x, event.y)

    def on_button_release_event(self, widget, event):
        print("release event", event.x, event.y)

    def on_motion_notify_event(self, widget, event):
        print("motion event", event.x, event.y)
Running our script again we will see that the terminal is filled with motion events when the mouse
passes over the MapEditor widget in our window. When we press and release the mouse buttons with
the mouse pointer over our MapEditor widget we also see press and release events.

To implement our panning we first want to keep track of the mouse motion and the currently held mouse button. We’ll do so using three fields:
self._mouse_x = 0    # The X coordinate of the pointer
self._mouse_y = 0    # The Y coordinate of the pointer
self._button = None  # The currently held mouse button
In our on_button_press_event we’ll record the X and Y coordinates of the mouse when a button is
pressed, along with the actual button being held.
def on_button_press_event(self, widget, event):
    self._mouse_x = event.x
    self._mouse_y = event.y
    self._button = event.button
When a mouse button is released, we will reset the mouse X and Y coordinates and set the _button
field back to None to indicate that no more button is held.
def on_button_release_event(self, widget, event):
    self._mouse_x = 0
    self._mouse_y = 0
    self._button = None
When the right mouse button is held down, we want to update the X and Y coordinates as the pointer
moves across our window. We do this by changing our on_motion_notify_event handler to update the
_mouse_x and _mouse_y fields if the _button field is equal to
Gdk.BUTTON_SECONDARY
(which corresponds to the right mouse button).
def on_motion_notify_event(self, widget, event):
    if self._button == Gdk.BUTTON_SECONDARY:
        self._mouse_x = event.x
        self._mouse_y = event.y
With these changes our MapEditor class will track the motion of the mouse pointer when the right
mouse button is held. However, we want to use this to move around the map. To do so we need to keep
track of our current location in the map. We’ll keep track of this in two additional fields:
self._camera_x = 0    # The X coordinate of the camera
self._camera_y = 0    # The Y coordinate of the camera
For simplicity, we’ll pretend that these coordinates correspond to the position of the top-left
corner of the MapEditor widget in our pretend map. We’ll also assume that our world has a 1-to-1
mapping to a pixel.
As we drag the mouse pointer over the MapEditor widget, we will need to keep track of the motion
delta of the mouse pointer, and add that to our camera coordinates. That is, as we receive
motion-notify-event
signals, we want to change our camera position by the same number of pixels as our pointer has
moved.
We can do this quite easily in our on_motion_notify_event handler. We have the last coordinates of
the mouse in the _mouse_x and _mouse_y fields, and the new coordinates of the mouse is in the
x and y fields of the
Gdk.EventMotion we receive in
the event argument. If we subtract the last position of the mouse from it’s current position, the
result is how far the mouse has travelled in the X and Y direction since our last recording. We can
then add this to our _camera_x and _camera_y fields to move the camera.
def on_motion_notify_event(self, widget, event):
    if self._button == Gdk.BUTTON_SECONDARY:
        self._camera_x += event.x - self._mouse_x
        self._camera_y += event.y - self._mouse_y
        self._mouse_x = event.x
        self._mouse_y = event.y
        self.queue_draw()
One final thing we added to our on_motion_notify_event method is a call to
queue_draw
when we update the camera coordinates. This tells GTK that we want it to redraw our widget, without
which we would not see anything until we did something to invalidate the widget (such as changing
the size of the window).
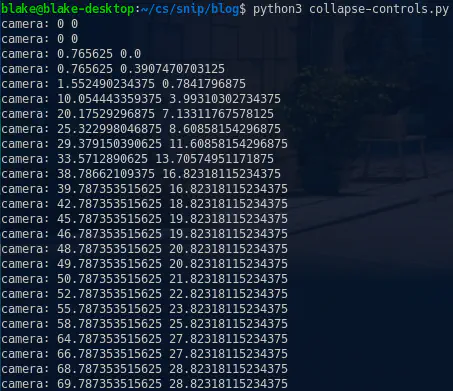
We’ll also change our on_draw method to print our the camera coordinates when it renders so we can
see them update as we drag the mouse around the MapEditor widget with the right mouse button held.
def on_draw(self, widget, context):
    # Get the widget and height of the widget
    width = self.get_allocated_width()
    height = self.get_allocated_height()

    # [Temporary] print the camera coordinates
    print("camera:", self._camera_x, self._camera_y)

    # Render a rectangle for the background of the editor
    context.set_source_rgb(0.11, 0.11, 0.11)
    context.rectangle(0, 0, width, height)
    context.fill()
With these changes in place we should see messages in our terminal when we drag the cursor over our
MapEditor that show the camera updating.
However, we’re not getting anything in our widget yet, as the camera coordinates are not being used in our rendering.
Next we’ll add the grid rendering to our MapEditor widget. We’ll draw two grids: a minor grid that
draws a line every 10 pixels and a major grid every 100 pixels:
A fairly nice approach to rendering this grid is to offset the start position of the grid lines by the camera coordinates, modulus the size of each grid line. This way, as the camera moves, the top-left corner of the grid follows the camera until it reaches the next grid line step before resetting. By doing so we are limiting the number of grid lines we have to draw to the size of the viewport.
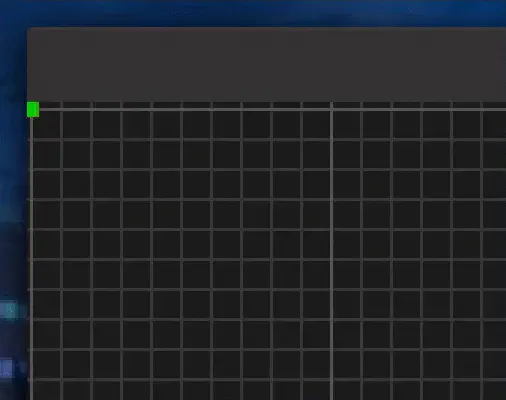
This may be somewhat hard to understand, so here is an animation that shows the camera position being updated by dragging the mouse. The start corner of the major grid is rendered with a green square and the minor grid with a red square.
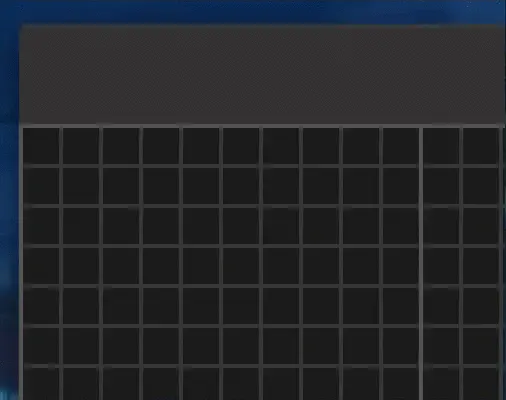
The grid appears to be panning as the mouse moves, however we can see that all we’re actually doing is slightly offsetting the starting point for the rendering of the grid.
The grid rendering code is quite simple:
context.set_line_width(1)
for color, step in [(0.2, 10), (0.3, 100)]:
    context.set_source_rgb(color, color, color)
    y = int(self._camera_y % step) + 0.5
    while y < height:
        context.move_to(0, y)
    	context.line_to(width, y)
    	y += step
    x = int(self._camera_x % step) + 0.5
    while x < width:
        context.move_to(x, 0)
        context.line_to(x, height)
        x += step
    context.stroke()
Another useful thing to note is that the start X and Y coordinates are clamped to an integer and then offset by half a pixel. The reason for this half-pixel offset is to make sure that the grid lines are always cleanly rendered with little to no aliasing visible. If we rendered the grid using fractional values instead, we would end up with heavy aliasing as shown in the animation below.
You can see how the grid is almost moving in and out of focus as it pans. This is because Cairo renders a line with a thickness of one pixel centered on the line. Therefore, we offset all our lines by half a pixel to keep them relatively clean.
Putting this all together gives us our complete MapEditor widget.
class MapEditor(Gtk.DrawingArea):
    def __init__(self):
        super().__init__()
        self.set_events(Gdk.EventMask.BUTTON_PRESS_MASK |
                        Gdk.EventMask.BUTTON_RELEASE_MASK |
                        Gdk.EventMask.POINTER_MOTION_MASK)

        self._camera_x = 0   # The X coordinate of the camera
        self._camera_y = 0   # The Y coordinate of the camera
        self._mouse_x = 0    # The X coordinate of the pointer
        self._mouse_y = 0    # The Y coordinate of the pointer
        self._button = None  # The currently held mouse button

        # Connect to the draw and mouse events
        self.connect("draw", self.on_draw)
        self.connect("button-press-event", self.on_button_press_event)
        self.connect("button-release-event", self.on_button_release_event)
        self.connect("motion-notify-event", self.on_motion_notify_event)

    def on_button_press_event(self, widget, event):
        self._mouse_x = event.x
        self._mouse_y = event.y
        self._button = event.button

    def on_button_release_event(self, widget, event):
        self._mouse_x = 0
        self._mouse_y = 0
        self._button = None

    def on_motion_notify_event(self, widget, event):
        if self._button == Gdk.BUTTON_SECONDARY:
            self._camera_x += event.x - self._mouse_x
            self._camera_y += event.y - self._mouse_y
            self._mouse_x = event.x
            self._mouse_y = event.y
            self.queue_draw()

    def on_draw(self, widget, context):
        # Get the width and height of the widget
        width = self.get_allocated_width()
        height = self.get_allocated_height()

        # Render a rectangle for the background of the editor
        context.set_source_rgb(0.11, 0.11, 0.11)
        context.rectangle(0, 0, width, height)
        context.fill()

        # Render our grids
        context.set_line_width(1)
        for color, step in [(0.2, 10), (0.3, 100)]:
            context.set_source_rgb(color, color, color)
            y = int(self._camera_y % step) + 0.5
            while y < height:
                context.move_to(0, y)
                context.line_to(width, y)
                y += step
            x = int(self._camera_x % step) + 0.5
            while x < width:
                context.move_to(x, 0)
                context.line_to(x, height)
                x += step
            context.stroke()
With the custom drawn widget complete we can move on to our control panel overlay. First we’ll
define a ControlPanel class that inherits from
Gtk.Box. This class represents our
control panel and allows us to add groups of widgets that stack vertically. To support this, we’ll
add an add_group method that
packs a control
group into the box.
class ControlPanel(Gtk.Box):
    def __init__(self):
        super().__init__(orientation=Gtk.Orientation.VERTICAL,
                         spacing=5)

    def add_group(self, group):
        self.pack_start(group, False, False, 0)
In the constructor for the ControlPanel class we invoke the
Gtk.Box constructor and set the
orientation
of the box to vertical, meaning that our control panel groups are arranged vertically. We also set
the spacing to
five pixels to ensure there’s a small gap between them.
Now we’ll define the class for our control panel groups. Each group is presented as an
expandable widget with a title.
Much like our ControlPanel widget, we support adding child widgets as rows.
class ControlPanelGroup(Gtk.Expander):
    def __init__(self, title: str):
        super().__init__(label=title)
        self._inner = Gtk.Box(orientation=Gtk.Orientation.VERTICAL,
                              spacing=5)
        self.add(self._inner)

    def add_row(self, widget):
        self._inner.pack_start(widget, False, False, 0)
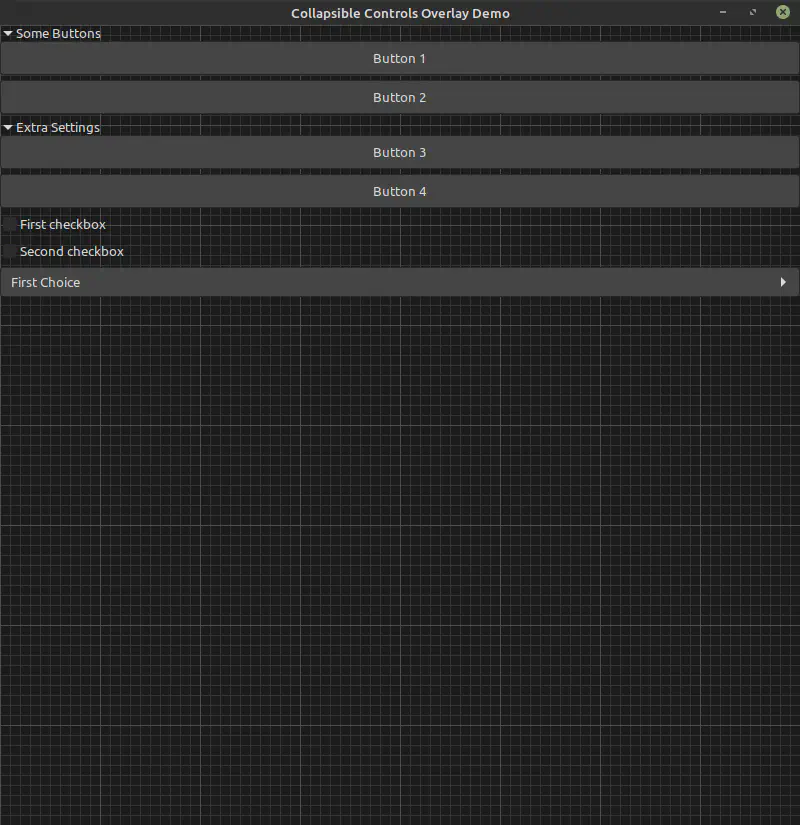
With these two classes in place we can create our demo control panel. We add two ControlPanelGroup
widgets and pack a few demo widgets into each.
class MyControlPanel(ControlPanel):
def __init__(self):
super().__init__()
self._first_panel = ControlPanelGroup("Some Buttons")
self._first_panel.add_row(Gtk.Button(label="Button 1"))
self._first_panel.add_row(Gtk.Button(label="Button 2"))
self.add_group(self._first_panel)
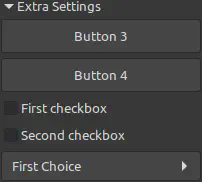
self._second_panel = ControlPanelGroup("Extra Settings")
self._second_panel.add_row(Gtk.Button(label="Button 3"))
self._second_panel.add_row(Gtk.Button(label="Button 4"))
self._second_panel.add_row(
Gtk.CheckButton.new_with_label("First checkbox"))
self._second_panel.add_row(
Gtk.CheckButton.new_with_label("Second checkbox"))
combo = Gtk.ComboBoxText()
combo.append("first", "First Choice")
combo.append("second", "Second Choice")
combo.append("third", "Third Choice")
combo.append("forth", "This one is quite long")
combo.set_active_id("first")
self._second_panel.add_row(combo)
self.add_group(self._second_panel)
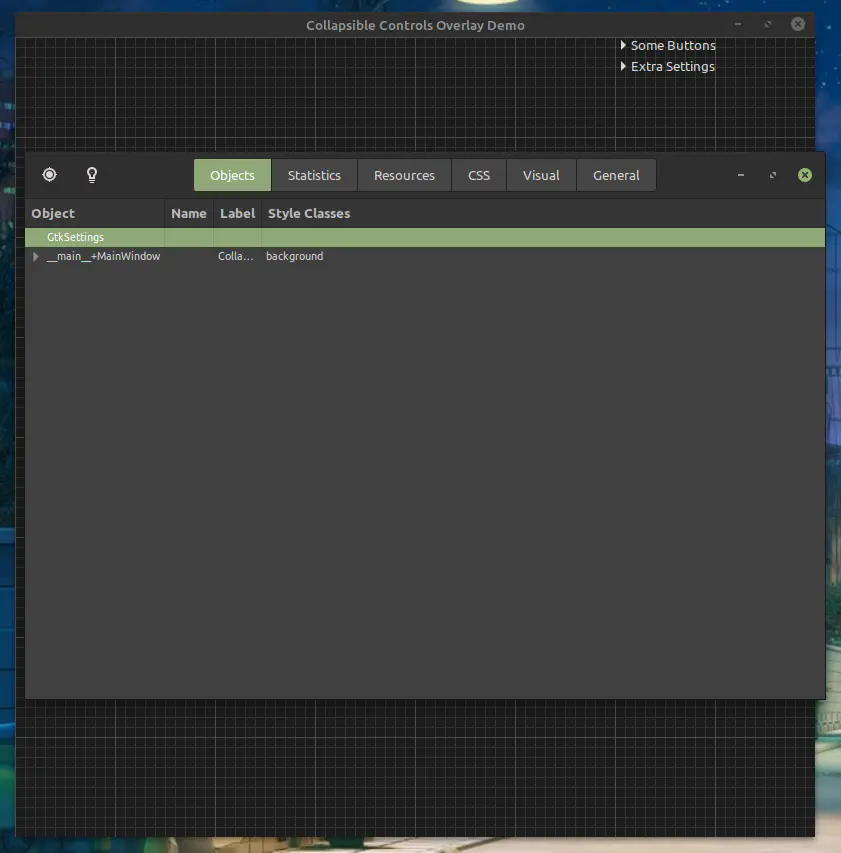
We now want to overlay our MyControlPanel widget over the MapEditor widget that dominates our
main window. To do so we will use a
Gtk.Overlay widget as the
immediate child of our window, and add the MapEditor and MyControlPanel widgets as overlays.
class MainWindow(Gtk.Window):
    def __init__(self):
        super().__init__()

        self.set_title("Collapsible Controls Overlay Demo")

        # Set the default window size to 800x800
        self.set_default_size(800, 800)
        # When our window is destroyed, exit the main event loop
        self.connect("destroy", Gtk.main_quit)

        # Create our map editor and control panel instances
        self._editor = MapEditor()
        self._controls = MyControlPanel()

        # Create the overlay widget
        self._overlay = Gtk.Overlay()

        # Add our editor and control panel as overlays
        self._overlay.add_overlay(self._editor)
        self._overlay.add_overlay(self._controls)

        # Add the overlay as the immediate child of the window
        self.add(self._overlay)
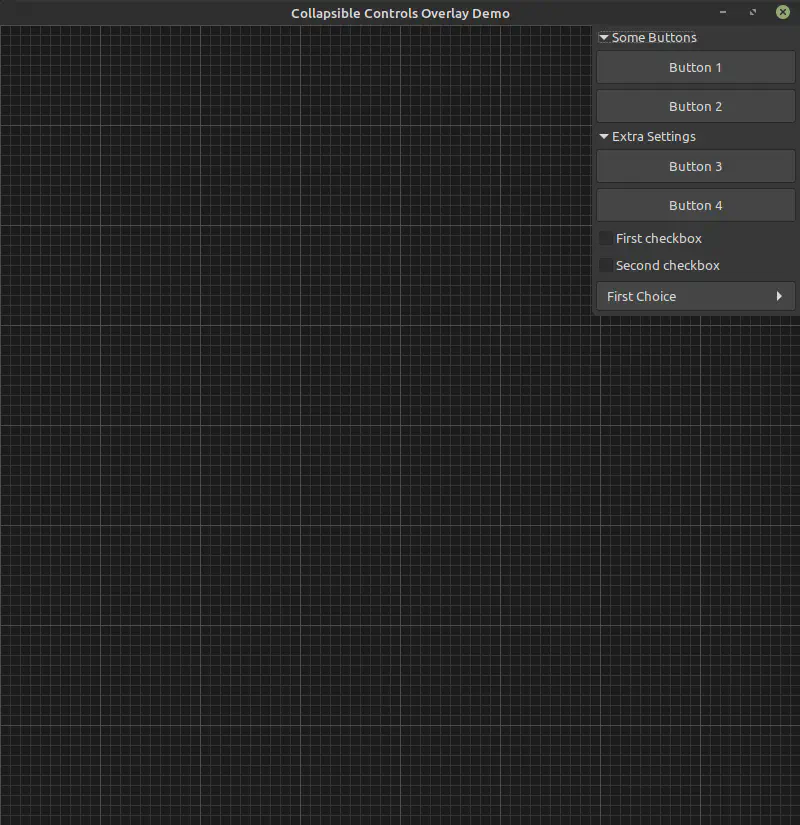
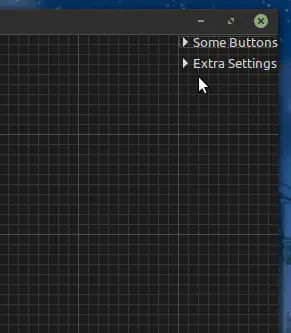
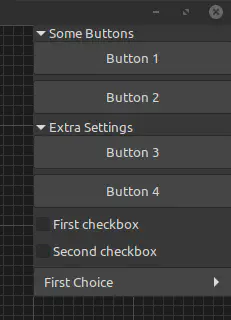
When we run our Python script we will see that the expanders and their widgets are indeed rendered over the top of our map editor. Unfortunately, when expanded, they cover far too much of the editor viewport!
What we want to do now is to tell the
Gtk.Overlay widget where to place
the MyControlPanel widget. The
Gtk.Overlay widget arranges
overlays using the
halign and
valign
properties of the overlaid widget. There are a number of options for these properties, which change
where they are placed:
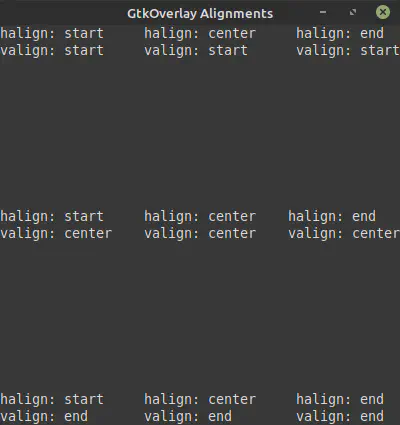
We want to position our control panel in the top-right of the window. To do this we want to call the
set_halign()
and
set_valign()
methods in our ControlPanel constructor.
class ControlPanel(Gtk.Box):
    def __init__(self):
        super().__init__(orientation=Gtk.Orientation.VERTICAL,
                         spacing=5)
        # Place the control panel in the top-right
        self.set_halign(Gtk.Align.END)
        self.set_valign(Gtk.Align.START)

    def add_group(self, group):
        self.pack_start(group, False, False, 0)
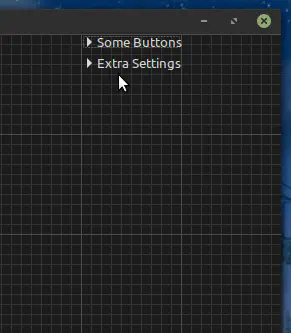
This arranges the panel in the top-right of the window, which is much better. However we can see
that there is a new problem: the size of the control panel changes when we expand and collapse each
of the ControlPanelGroup widgets.
Of course this is perfectly natural behaviour for a GTK application. However, we want to fix the
width of the control panel. We’ll do this by specifying the width in the size request for each
ControlPanelGroup by calling the
set_size_request
method. We’ll leave the height at minus one so it’s calculated based on the children of the group.
class ControlPanelGroup(Gtk.Expander):
    def __init__(self, title: str):
        super().__init__(label=title)
        self._inner = Gtk.Box(orientation=Gtk.Orientation.VERTICAL,
                              spacing=5)

        # Set the size request to 200 pixels wide
        self.set_size_request(200, -1)

        self.add(self._inner)

    def add_row(self, widget):
        self._inner.pack_start(widget, False, False, 0)
With this change our control panel seems a bit more sane. Well, it doesn’t jump around as much as it did before.
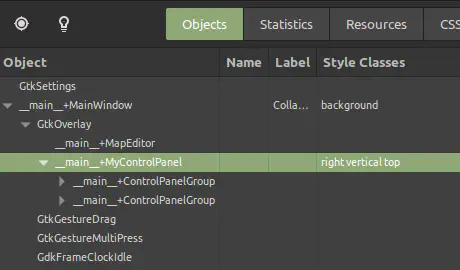
We still have a problem that the control panel has no background to it. To understand why this is we can dive into the CSS nodes of our application using the GTK inspector.
We can bring up the inspector for our application by setting the GTK_DEBUG environment variable to
interactive. We can do this by changing our invocation of the Python interpreter when we run our
script:
GTK_DEBUG=interactive python3 collapse-controls.py
This will bring up the GTK inspector alongside our application:
We can now navigate through the object tree until we get to our MyControlPanel widget.
With this selected we can switch to the CSS nodes by selecting the light-bulb in the top-left of the inspector window to change to properties view (the icon will change from a light-bulb to a list icon). We can then select CSS nodes from the dropdown beneath it.
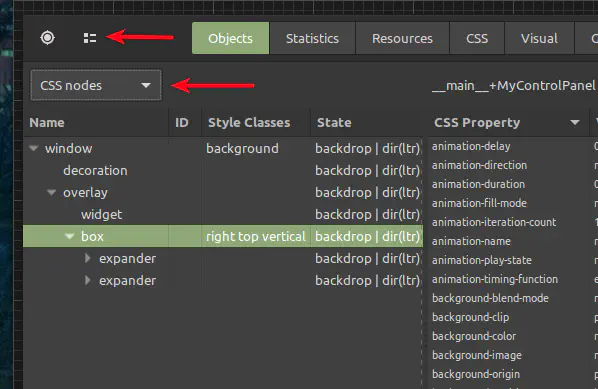
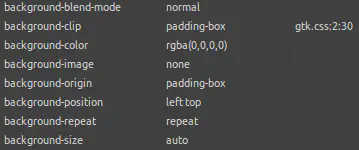
Taking a look at the CSS properties for the MyControlPanel widget on the right side of the
inspector we can see that there is no background color or image specified:
We want to change that, so we’ll edit the CSS for our application. To apply out CSS we’ll add a
control-panel class to our MyControlPanel widget from within the GTK inspector. To add a class,
double-click in the Style Classes column for the current widget. This brings up the
Style Classes popover where we can add our new class:
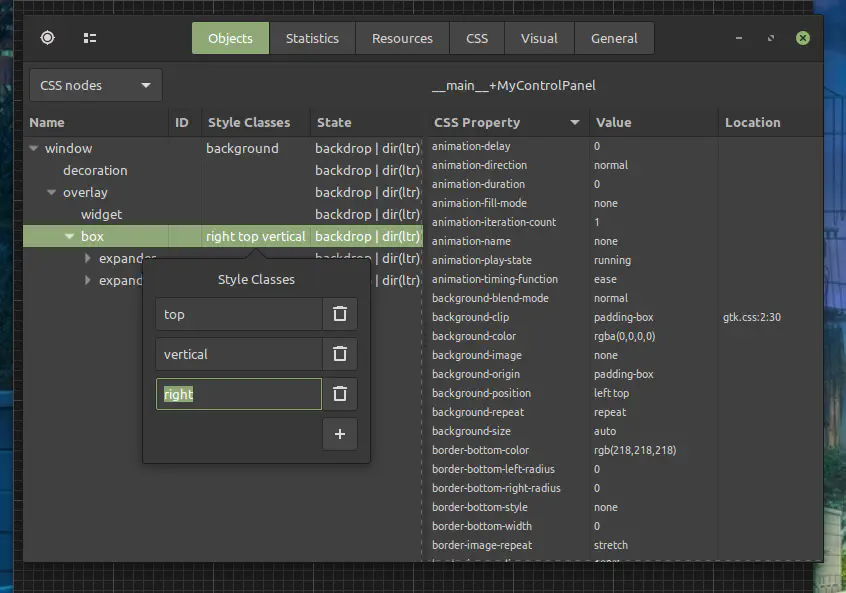
Click the + button in the Style Classes popover to add a new class, and enter the name
control-panel.

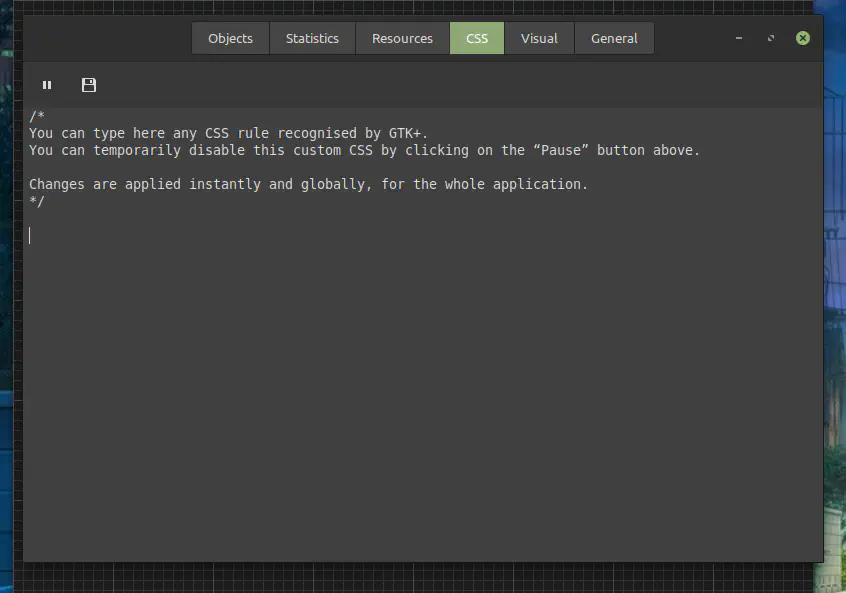
We can now edit the inline CSS for by selecting the CSS tab in the top of the inspector. This presents us with an editor in which we can write some CSS.
We’re going to add the following CSS to set the background color of our control panel widget – to
which we’ve just applied the control-panel class. We’ll set the background color to the standard
background color for the current GTK theme.
.control-panel {
  background-color: @bg_color;
}
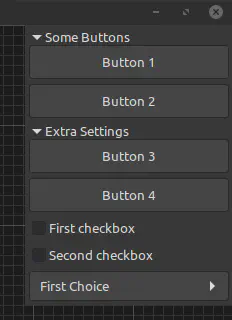
Immediately after making this change you should see that our control panel now has a background color:
Whilst we’re live editing the CSS we might as well add some padding to the control panel too.
.control-panel {
  background-color: @bg_color;
  padding: 4px;
}
This will nudge our control groups away from the edges of the control panel, and make the UI a little cleaner looking.
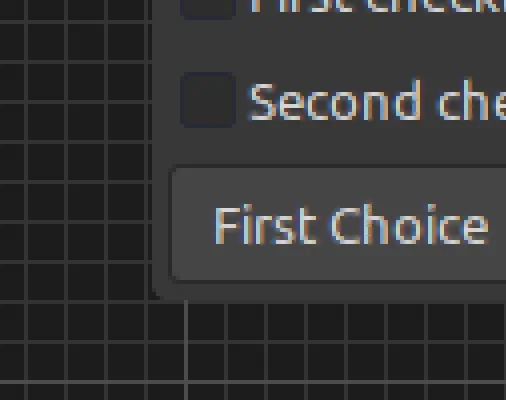
Looking closely at the bottom-left corner of the control panel, we can see quite a sharp corner:
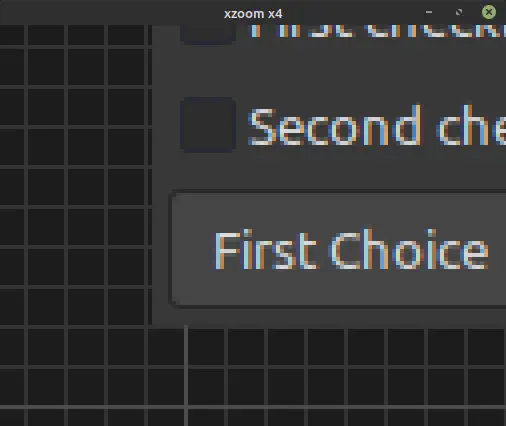
Let’s update our stylesheet a bit more to round off the bottom-left corner with a four pixel radius.
.control-panel {
  background-color: @bg_color;
  padding: 4px;
  border-bottom-left-radius: 4px;
}
Now that we’re happier with the appearance of our control panel we can add the CSS to our Python
script. To do this we need to load our CSS into a
Gtk.CssProvider and then add
the provider to the
Gtk.StyleContext
for the current screen. We can do this in a function that we’ll call install_css, which we’ll call
before we create our window:
def install_css():
    screen = Gdk.Screen.get_default()
    provider = Gtk.CssProvider()
    provider.load_from_data(b"""
      .control-panel {
        background-color: @bg_color;
        padding: 4px;
        border-bottom-left-radius: 4px;
      }
      """)
    Gtk.StyleContext.add_provider_for_screen(screen, provider, 600)

install_css()
window = MainWindow()
window.show_all()
Gtk.main()
Notice that we have to use a bytes rather than an str in our argument to the
load_from_data
method of our Gtk.CssProvider
instance.
For this CSS to work we also need to add the control-panel class to our ControlPanel widget.
We’ll do that in the constructor for ControlPanel by first retrieving the
Gtk.StyleContext for the
widget and then adding the control-panel class by calling the
add_class
method.
class ControlPanel(Gtk.Box):
    def __init__(self):
        super().__init__(orientation=Gtk.Orientation.VERTICAL, spacing=5)
        # Place the control panel in the top right
        self.set_halign(Gtk.Align.END)
        self.set_valign(Gtk.Align.START)

        # Add the .control-panel CSS class to this widget
        context = self.get_style_context()
        context.add_class("control-panel")
After this final change to the ControlPanel widget we should have a demo that works fairly well.
If you want to download the source code for this demo you can find it at the following GitHub Gist:

 GitHub Gist
•
Blake Rain
GitHub Gist
•
Blake Rain