New Site and Blog
New Site and Blog
I have a new website and blog using the Ghost platform. Here I touch on the setup and the goals for this site.
tl;dr New website using Ghost was easy to set up.
So I now have a new website. It’s been quite a while since I had anything resembling a website that wasn’t something corporate. My last website died a few years ago, mostly from lack of updates or any fresh content. You can still see the old source code on GitHub, where the last commit was in 2016. For the past year or so I’ve been planning a new website with some vague notion of posting some thoughts, tutorials and no doubt other nonsense. Of course, planning and execution are entirely different things, but hopefully I’ll be better with this one than I was the last.
So for this first post I wanted to share some information relating to how I set up the site by (mostly) following simple instructions. I also wrote some weak Python code to provide a simple search feature, which I shall explain in a subsequent post.
See here for adding search: https://blakerain.com/blog/adding-search-to-ghost
Ghost CMS
I’ve used Ghost to create this website. Ghost is a CMS, written in JavaScript, that provides a nice set of features without seeming to be too bloated.

Apart from it’s small size and not being built in PHP, some of the features that attracted me to Ghost are:
- It comes under a permissive MIT license.
- Has quite a nice editor for creating content, including the ability to use Markdown or add HTML.
- It uses simple Handlebars-based themes that are pretty easy to construct.
- Ghost seems to play nicely with mobile out of the box, although this is likely to be very theme dependent.
- There are content and administration APIs for me to exploit, along with web-hooks.
- I quite like working with JavaScript.
- Ghost seemed easy to self-host, which is usually my preferred option.
Deploying Ghost
For the most part, installation of Ghost required following the instructions on the Ghost website. I roughly followed the guide for Ubuntu, as that is the distribution I chose:
To deploy Ghost I first created an AWS instance with Ubuntu 18.04 and attached an EIP to it. I used an EIP in case I needed to replace the instance (such as if it entered a degraded state), or I wanted to use an ELB or some other magic. I configured the security group for the instance’s sole network interface to allow SSH from my own IP along with HTTP and HTTPS from anywhere else:
| Port | Source CIDR | Description |
|---|---|---|
| tcp/22 | MY-IP/32 | Let me SSH into the server |
| tcp/80 | 0.0.0.0/0 | Allow HTTP over IPv4 |
| tcp/80 | ::/0 | Allow HTTP over IPv6 |
| tcp/443 | 0.0.0.0/0 | Allow HTTPS over IPv4 |
| tcp/443 | ::/0 | Allow HTTPS over IPv6 |
Once the instance had started and I was able to SSH in to it, I made sure that the latest updates had been run and checked that unattended-upgrades was also in effect:
sudo apt update && sudo apt upgrade -y
systemctl status unattended-upgrades.service
The Ghost Ubuntu server setup suggests logging in with the root user and then creating a user for yourself. This is not really necessary with the Ubuntu variant used by AWS, as the default user of ubuntu was sufficient for me. I skipped forwards to the step that suggested I install NGINX, NodeJS and then the Ghost CLI. I didn’t install MySQL, as I don’t want to run that on the web server.
# Install the NGINX server
sudo apt install nginx

# Download NodeJS v10 and install
curl -sL https://deb.nodesource.com/setup_10.x | sudo -E bash
sudo apt install nodejs

# Install the Ghost CLI tool
sudo npm install ghost-cli@latest -g
For the database I set up a MySQL instance on AWS RDS. This means that I can better control the scale (and cost) of the database, and I also get daily snapshots and security updates.
After setting up the RDS instance, I followed the instructions to install Ghost in the /var/www/ directory, which is is mostly a case of creating the directory under /var/www/ and then running ghost install. The CLI prompted for some questions which were very easy to answer and then proceeded to install Ghost into the chosen directory. This installation included the set up of Let’s Encrypt, which I managed to ruin. Luckily running ghost setup ssl sorted the problem.
Finally I could make sure that the site was running using ghost ls, which gave some rather nice output:

Customizing Ghost
Once I had an installation that was working I wanted to be able to customize it. The first thing I wanted to do was to make sure that the site was not generally available. Conveniently Ghost includes a simple way of doing this by switching the site to private, disabling access, SEO and social features. This option can be found in the General settings of the administration portal:
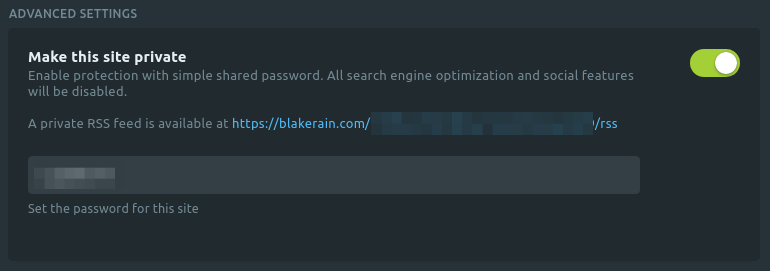
Once the site was private I felt more confident playing around with the Ghost settings, testing the publishing options and the site structure, without fear of exposing my utter incompetence. There are several options relating to site metadata and social stuff which I don’t understand. You can apparently link it to you Facebook Page, however as I’m not a boomer I don’t have a Facebook Page. You can link it to Twitter as well it seems, but I don’t use Twitter either.
There are a lot of integrations that can work with Ghost, which are listed on the Ghost website:

I’ve really only used the built-in Unsplash integration along with Commento to provide embedded comment threads.
After messing around with the tags, routing and other settings it was time to settle on a theme. Ghost has a large set of themes available on their marketplace, many of which are free to use if you’re so inclined.
After much indecision I decided to settle on the default theme for Ghost, which is called Casper. The theme that I am using is actually a slightly modified version. I only made a few minor changes, mostly relating to colors and to add a few custom templates. You can find the sources for my customization here:
https://github.com/HalfWayMan/blakerain.com
Hopefully now that this is all set up I will remember to start writing posts more often than once per year!